How to transcode a file?
This page describes how to transcode a file (re-encode the elementary audio, video, and subtitle streams) using VLC.
We use the transcode module to re-encode the streams, and then the std module to mux them together into a container. Hence the basic structure of the code will look like the following:
$ vlc sample.mp4 --sout="#transcode{ }:std{ }"
To know about how the components of transcode and standard output interact, refer to the Combining Transcoding and Standard Output section.
This page provides the code for performing simple trancoding and saving the resultant file.
How to transcode a file and save it locally?
To save the file locally, we will set access=file in the std block.
Case 1: Re-encode using different codecs but mux it in the same container
Suppose you have a file named sample.mp4 which has been encoded by h264 video-codec and mp4a audio-codec. (You can find which codecs have been used to encode a file by playing it on VLC and navigating to :menuselection:Tools -> Codec Information).
For this example, let’s say we wish to re-encode this media file by using the h265 and mpga codecs, and want the final output to still be contained in an MP4 container.
In this case, the following code will do the required transcoding:
$ vlc sample.mp4 --sout="#transcode{acodec=mpga, vcodec=h265}:std{access=file, mux=mp4, dst=sample_new.mp4}"
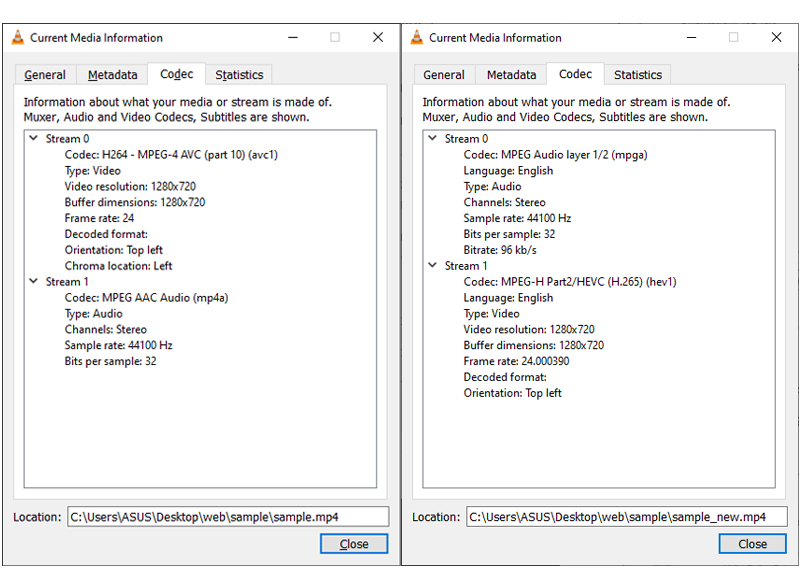
Comparing the codec-information of the original and the new file will look something like the following:

Even though both the files have the same extension, they have been encoded by different codecs.
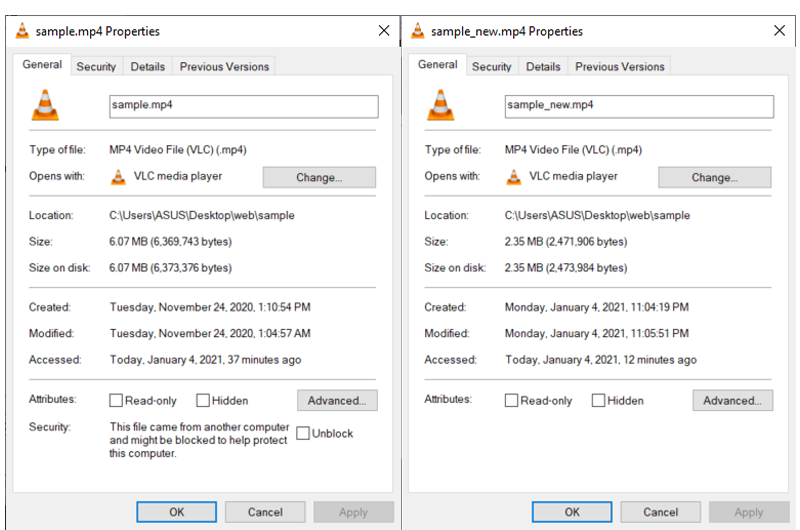
As the H.265 codec offers better compression than H.264, the new file is significantly smaller than the old one, as can be seen in the following figure:

Notice how smaller the new file is in terms of size as compared to the original one.
Case 2: Re-encode using different codecs and mux it in a different container
Let’s suppose that we want to encode the same sample.mp4 file while using h265 and mpga codecs, and we also want the final output to be contained in an MKV (matroska) container. Note that we can do this because the above mentioned codecs are compatible with the matroska container.
For this conversion, the code will look like the following:
$ vlc sample.mp4 --sout="#transcode{acodec=mpga, vcodec=h265}:std{access=file, mux=mkv, dst=sample_new.mkv}"
Another Example for Case 2
For this example, we will transcode the sample.mp4 file by encoding it using theo and vorb codecs, and mux the output in an OGG container. Notice that in this case, we have to change the container because theo and vorb are not compatible with MP4.
We can do the required transcoding by running the following code:
$ vlc sample.mp4 --sout="#transcode{acodec=vorb, vcodec=theo}:std{access=file, mux=ogg, dst=sample_new.ogg}"
Other things that can be done by Transcode
In the transcode block, we can detail on other specifications if we want more customization, for example:
Bitrate of the audio and video streams (
vbandab).Frame rate (
fps) of the video stream.Sample rate (
samplerate) of the audio stream.Number of audio channels (
channels), etc.
Extending the second example, if you wish to detail on the above mentioned specifications, then the code might look something like this:
$ vlc sample.mp4 --sout="#transcode{vcodec=h265, vb=800, fps=24, acodec=mpga, ab=128, channels=2, samplerate=44100, scodec=none}:std{access=file, mux=mkv, dst=sample_new.mkv}"
Apart from mentioning the specifications while transcoding, we can also apply various filters and effects, including:
Video filters (
vfilter) like blur, ripple, rotate, adjust (contrast, brightness, hue, saturation, gamma), etc.Subtitle filters (
sfilter) like marq, logo, mosaic, etc.Audio filters (
afilter) like equalizer, karaoke filter, etc.
Further, we can also combine transcoding and streaming, where instead of saving the final output (the transcoded and muxed stream), we directly stream it over the local network.